Integrating Google Bard with Python via Bard-API

Using Google Bard in Python via bardapi

Google Bard is a large language model (LLM) similar to OpenAI’s ChatGPT, capable of answering questions, generating creative text, translating languages, and producing various forms of creative content. Currently, Google Bard is available to the public, but in a limited beta release. Users can join a waitlist to apply for access to Bard.

For those eager to integrate Google Bard with Python, it is important to note that there is currently no official API available. However, we can utilize Daniel Park’s bardapi to use in python environment.

There are several advantages of using Google Bard (bardapi version) over OpenAI (API version).

  1. Bard is more up-to-date compared to OpenAI, whose knowledge cutoff was in September 2021.
  2. Bard is currently available for free usage unlike the OpenAI API version.
  3. Bardapi has the ability to understand chat history, which is not readily available with the OpenAI API. However, it is worth noting that by leveraging tools like LangChain, it is possible to integrate memory state functionality with the OpenAI API, enabling similar capabilities.

Below is a sample guide on how to integrate Bard with python using the Bardapi.


# Script reference: https://github.com/dsdanielpark/Bard-API

from bardapi import Bard
import os
import requests
os.environ['_BARD_API_KEY'] = 'xxxxxxx'

# This will allow us to continue conversation with Bard in separate query
session = requests.Session()

session.headers = {
"Host": "bard.google.com",
"X-Same-Domain": "1",
"User-Agent": "Mozilla/5.0 (Windows NT 10.0; WOW64) AppleWebKit/537.36 (KHTML, like Gecko) Chrome/91.0.4472.114 Safari/537.36",
"Content-Type": "application/x-www-form-urlencoded;charset=UTF-8",
"Origin": "https://bard.google.com",
"Referer": "https://bard.google.com/",
        }

session.cookies.set("__Secure-1PSID", os.getenv("_BARD_API_KEY")) 

bard = Bard(token=token, session=session, timeout=30)
bard.get_answer("We will talk about latest presidents in Germany and Italy. Who are they")['content']

# Continued conversation without set new session
bard.get_answer("What we talk about just now??")['content']
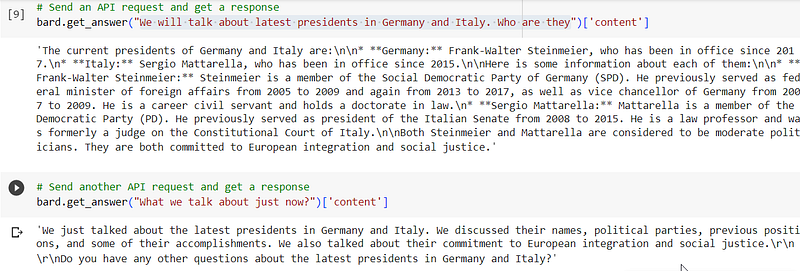

Python Bard API continuing conversation within a session

Google Bard also has the ability to return images, which has been enabled in the development version of Bard-API. We can expect this feature to be available in the production version soon.

Conclusion

In conclusion, the Bard-API package provides a practical and effective means to interact with Google Bard’s response API within your Python environment, bridging the gap until the official release of the Bard API.

By utilizing Bard-API, you can fully explore and leverage the capabilities of Bard, allowing you to experiment with various queries and unlock the valuable insights it has to offer.

This post has also been published on Medium.
PandasAI — Exploratory Data Analysis with Pandas and AI prompts

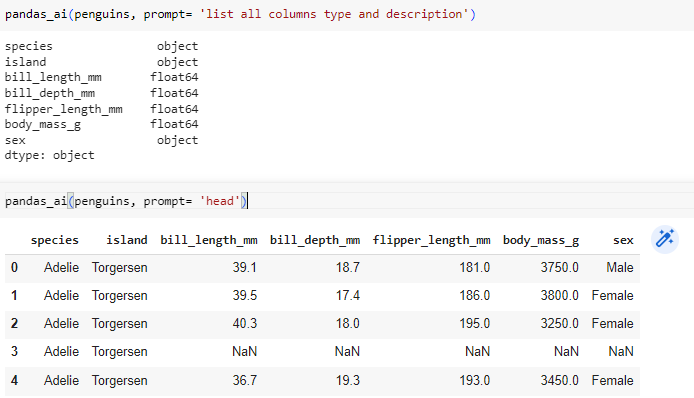
I came across PandasAI while searching for AI integration with Pandas dataframes. My primary objective is to conduct fast exploratory data analysis on new datasets, which would guide my future analysis approach. PandasAI appeared to meet my needs in this regard. In summary, PandasAI is a Python library that seamlessly integrates generative artificial intelligence capabilities (eg Openai) into Pandas, enabling users to perform basic Pandas operations using simple text prompts. It’s worth noting that PandasAI is designed to complement rather than replace Pandas.

What I like about pandasAI

  1. Alternatives LLM integration: Besides openai, PandasAI support integration with Hugging Face’s Starcoder, which is free to use and works pretty well with PandasAI
  2. Return Dataframe Object: PandasAI returns dataframe objects that can be further processed by Pandas or PandasAI itself.
  3. Simplified Plotting process: PandasAI simplifies common plotting tasks for easy data visualization.

In the following sections, we explore a range of common tasks that can be performed by prompting the dataframe instead of the usual pandas operations. We will use a sample dataset “Penguins” loaded from seaborn as our study. We will also be using the Hugging Face starcoder LLM which is free. However, I find that openai is able to deliver the right output with longer and more complex prompt.

!pip install pandasai
# Setting up for prompt
import pandas as pd
from pandasai import PandasAI
from pandasai.llm.starcoder import Starcoder
from pandasai.llm.openai import OpenAI
import seaborn as sns

# Instantiate a LLM
# Openai
# llm = OpenAI(api_token="openai_key")

# Starcoder
llm = Starcoder(api_token="hugging face api key")
pandas_ai = PandasAI(llm)

# Load dataset
penguins = sns.load_dataset("penguins")
Basic Operations prompt
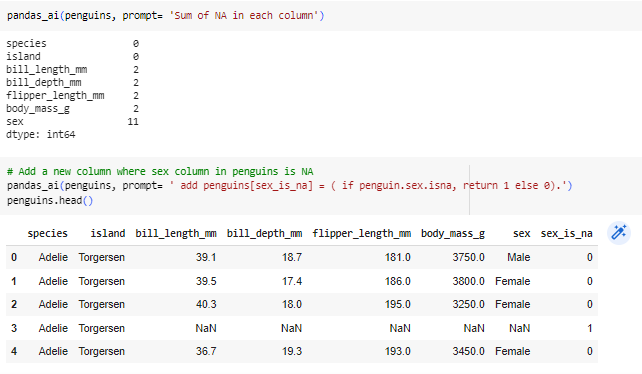
NA operations
Fillna and row operations

There are some cases where I did not managed to get an output (openai llm might do a better job) such as below.

# it set to the penguins dataframe instead.
penguins_update = pandas_ai(penguins, prompt= 'return a copy. penguin[ bill_length_mm] = 0 if island = Torgersen', show_code=True)
# Does not return any output
penguins_newcol = pandas_ai(penguins, prompt= 'Add new column "bill_length_cm" by taking "bill_length_mm" /100.')

In conclusion, PandasAI excels at enabling simple and clean exploratory analysis, particularly with its seamless integration of Starcoder, which eliminates cost concerns. However, it may not perform as effectively with longer and more complex prompts, especially when used with Starcoder. It’s important to note that while PandasAI offers valuable functionalities, you will still rely on Pandas for more extensive data manipulation and analysis tasks.

This post has also been published on Medium

Extracting Web Analytics Data using Python & Adobe Analytics 2.0 APIs

The Adobe Analytics 2.0 APIs provide a powerful way to directly interact with Adobe’s servers, enabling you to perform various actions programmatically that were previously only available through the user interface. In this blog post, we will explore how to leverage Python and the 2.0 API to extract web analytics data from Adobe Analytics.

Getting Started: OAuth Server-to-Server Credentials

The Service Account (JWT) credentials have been deprecated in favor of the OAuth Server-to-Server credentials. This guide will focus on using the latter. To obtain the API, Client and Secret key, you can refer to the official Adobe Developer documentation on the setup.

Authenticating and Accessing Adobe Analytics 2.0 API with Python

import requests
from authlib.integrations.requests_client import OAuth2Session

# Configure the Adobe Analytics API credentials
client_id = 'YOUR CLIENT ID'
client_secret = 'YOUR CLIENT SECRET'
token_endpoint = 'https://ims-na1.adobelogin.com/ims/token'
company_name = 'TGT_COMPANY'

# Create an OAuth2Session object with the client credentials
oauth = OAuth2Session(client_id, client_secret, scope='openid AdobeID additional_info.projectedProductContext')

# Fetch the access token from Adobe IMS
token = oauth.fetch_token(token_endpoint)

## Test a simple GET query
api_url = r'https://analytics.adobe.io/api/{}/annotations?locale=en_US&limit=10&page=0&sortProperty=id'.format(company_name)

headers = {
'Authorization': 'Bearer ' + token['access_token'],
'x-api-key': client_id
}
response = requests.get(api_url, headers=headers)

if response.status_code == 200:
    data = response.json()
print(data)
else:
print('Error:', response.status_code, response.text)

The following Python script demonstrates the authentication process and making consecutive API requests using Authlib.

Using the Reporting API

The /reports endpoint serves as the primary endpoint for reporting requests to retrieve web analytics metrics. Since the /reports endpoint utilizes the same API as the Analytics Workspace UI, it offers extensive configuration options. To initiate a report request, we must provide a Date Range, Metrics, and at least one Dimension. The /reports endpoint requires a specific JSON data structure to define the requested report. You can refer to the sample code below for the structure. For more informationon creating the JSON Structure, you can visit the Adobe Analytics Docs.

# Setting up for the JSON Structure
# Getting the Visits and Page views from Jun 1st to Jun 5th group
# by each day results.

RSID = 'Report Suite ID'
START_DATE = '2023-06-01'
END_DATE = '2023-06-05'
MIDNIGHT = 'T00:00:00.000'
DATE_RANGE = START_DATE + MIDNIGHT + '/' + END_DATE + MIDNIGHT

DIM = 'variables/daterangeday'
METS = ['metrics/visits','metrics/pageviews']
METS_OBJ = [{'id':x} for x in METS]

query_json = {
"rsid":RSID,
"globalFilters":[
                  {
"type":"dateRange",
"dateRange":DATE_RANGE
                  }
               ],
"metricContainer":{
"metrics":METS_OBJ,

              },
"dimension":DIM,
"settings":{
"dimensionSort":"asc"
               }
}

api_url = r'https://analytics.adobe.io/api/{}/reports'.format(company_name)

response =requests.post(url=api_url, headers=headers, json=query_json)

# Process the response
if response.status_code == 200:
    data = response.json()
else:
print('Error:', response.status_code, response.text)

Formatting the Response Output

Upon receiving the response from the /reports endpoint, you can format the output in a tabular structure for better readability and analysis.

df  =pd.DataFrame(response.json()['rows'])
df.columns = [DIM+'_key',DIM,'data'] #rename columns<br>
dfa = pd.DataFrame(df['data'].to_list())
dfa.columns = METS
output = pd.concat([df.iloc[:,:-1],dfa],axis='columns')
output

Conclusion

We can leverage Python and the Adobe Analytics 2.0 APIs to provides a automated solution for extracting web analytics data. By utilizing OAuth Server-to-Server credentials and making API requests, we can automate data retrieval, generate custom reports, storing to databaes and gain valuable insights.

This post has also been published on Medium.
Effortless Prompt Generation: Auto-generating AI System Prompt Phrases with ChatGPT

Prompt engineering is essential for optimizing behavior and output of AI systems like ChatGPT. Creating effective prompts is challenging and time-consuming, especially when tailoring them for different roles/persona. However, we can utilize ChatGPT’s capabilities to generate prompts for us.

By empowering ChatGPT with custom knowledge on crafting effective prompts, we enable it to learn the skill of generating prompts tailored to various roles. To impart this custom knowledge, we leverage a collection of websites that provide good instances of well-crafted system prompts.

In this blog post, we will explore using Python, ChatGPT, and the LangChain module to generate role-specific prompt phrases. LangChain is a versatile tool that enables the conversion of external sources into document objects. Converted document objects can then be indexed in databases like Chroma, enabling fast and efficient information retrieval. This integration allows AI systems such as ChatGPT to access a broad spectrum of knowledge sources.

Setting up the Environment

Below code snippet demonstrates the necessary steps to extract additional data from websites, create embeddings, utilize Chroma vector store, load documents from the web, and persist the processed instance. These steps lay the foundation for generating system prompt phrases using the extracted data.

# intalling the necessary libraries in Jupyter
!pip install tiktoken
!pip install openai
!pip install chromadb
!pip install langchain
!pip install nest_asyncio
from langchain.embeddings.openai import OpenAIEmbeddings
from langchain.vectorstores import Chroma
from langchain.text_splitter import RecursiveCharacterTextSplitter
from langchain.llms import OpenAI
from langchain.chains import RetrievalQA
from langchain.chat_models import ChatOpenAI
from langchain.document_loaders import WebBaseLoader
from langchain.prompts import PromptTemplate
import nest_asyncio

nest_asyncio.apply()

# sample website with good system prompts
tgt_sites = ['https://github.com/f/awesome-chatgpt-prompts',
'https://www.greataiprompts.com/prompts/best-system-prompts-for-chatgpt/',
'https://stackdiary.com/chatgpt/role-based-prompts/']

def add_documents(loader, instance):
    documents = loader.load()
    text_splitter = RecursiveCharacterTextSplitter(chunk_size=1000, chunk_overlap=100, separators= ["\n\n", "\n", ".", ";", ",", " ", ""])
    texts = text_splitter.split_documents(documents)
    instance.add_documents(texts)

embeddings = OpenAIEmbeddings(openai_api_key='YOUR_OPENAI_API_KEY')
instance = Chroma(embedding_function=embeddings, persist_directory='PATH_TO_PERSIST_DIRECTORY')

loader = WebBaseLoader(tgt_sites)
if loader:
    add_documents(loader, instance)

instance.persist()
instance = None

instance = Chroma(persist_directory='PATH_TO_PERSIST_DIRECTORY', embedding_function=embeddings)

Generating System Prompt Phrases

Now that we have set up our environment and loaded the necessary data, we can proceed to generate system prompt phrases using ChatGPT. We will utilize the RetrievalQA class from Langchain, which incorporates the ChatOpenAI model to interact with the language model. Here is the code snippet to generate system prompt phrases:

qa = RetrievalQA.from_chain_type(
    llm=ChatOpenAI(
        model_name="gpt-3.5-turbo",
        temperature=0,
        openai_api_key='YOUR_OPENAI_API_KEY'
    ),
    chain_type="stuff",
    retriever=instance.as_retriever()
)

query_str = """
              Craft a paragraph of how chatgpt (address as you) supposed to act based on the role stated. 
              Provide expectation of the required scope, skillset and knowledge. 
              If there is no specific role found, use relative reference if necessary. 
              The role is "python blog professional writer". Maximium 5 sentences. 
              Start the paragraph with "I want you to act as a "

            """
output_string = qa.run(query_str)
print(output_string)
[Sample output]
I want you to act as a Python blog professional writer. As a ChatGPT, you are expected to have a good understanding of Python programming language and its various libraries and frameworks. You should be able to write informative and engaging blog posts that cater to both beginners and advanced users. Your writing should be clear, concise, and well-structured, with a focus on providing practical examples and use cases.Additionally, you should be able to keep up with the latest trends and developments in the Python community and incorporate them into your writing.

In this script, our focus is on generating system role prompts. You can append your specific requests or target tasks to these prompts for ChatGPT to understand and respond accordingly. To enhance ChatGPT’s capabilities, you can include additional relevant websites, expanding its knowledge base for prompt generation in various roles and scenarios.

Conclusion

In this blog post, we explored the process of using ChatGPT and additional data extracted from a webpage to generate system prompt phrases. By leveraging the power of language models and retrieval techniques, we can create informative and context-aware prompts to guide AI systems more efficiently.

This post has also been published on Medium.

Create your own GIF from your favourite anime

Python Modules – Use pip install :

  1. pytube: Download Video (only if your source is from youtube)
  2. moviepy: For video editing

Python Codes

from pytube import YouTube
from moviepy.editor import *

## Download youtube with highest resolution
yt_video = YouTube('your_youtube_url_link')
dl_file_location = yt_video.streams.filter(progressive=True, file_extension='mp4').order_by('resolution').desc().last().download()

## Open the downloaded file for editing
clip = VideoFileClip(dl_file_location)
clip = clip.subclip(0, 3)
clip.write_gif(r'Your_gif_location.gif')

The simple way to export Shopee Ads keyword bids data to Excel

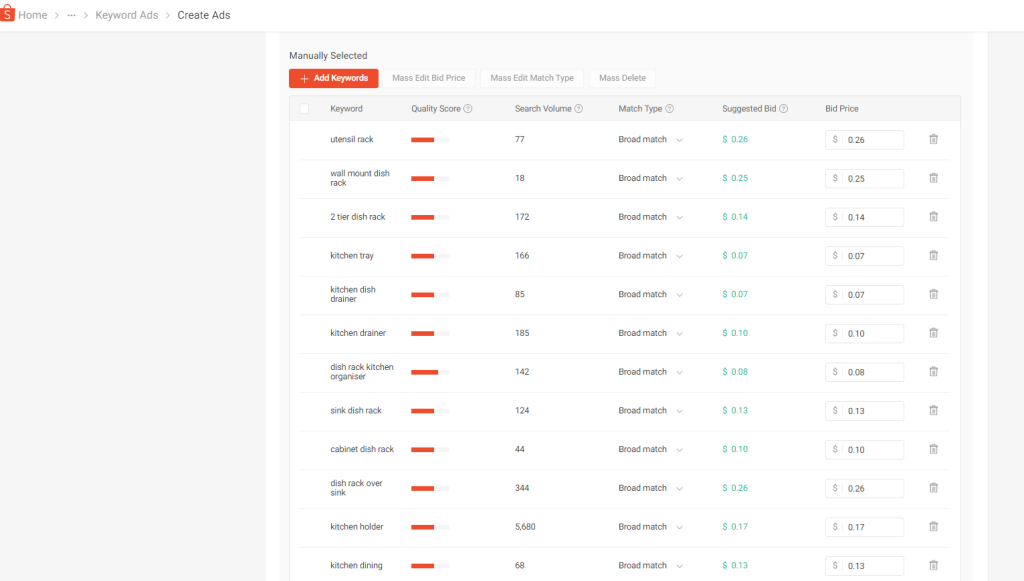
Selecting which keywords to bid for for keywords Ads in Shopee can be a hassle on Shopee platform. One of the main reason is that you cannot really sort or rank by the number of searches and/or bid price on Shopee platform. Having the option to export to excel/csv can really help on the analysis. And is really simple to do so with Python.

Navigate to the “Create (keyword) Ads”. Select Add Keywords and add as many related keywords as you like. Once completed, save the page as html file. Next we will use python pandas to parse the table tag in the html file and generate as pandas DataFrame.

## Sample Code
import pandas as pd

tgt = r'C:\yourfilelocation\shopee.html'

# list of table. 
# For this, table 0 is header col and table 1 is data
tb = pd.read_html(tgt) 

# Assign header from table 0 to table 1
tb[1].columns= tb[0].columns.tolist() 

# Drop empty columns
bid_table = tb[1].dropna(1,'all')     

# Can save to excel as well
bid_table.to_csv(r'c:\data\output.csv', index=False)

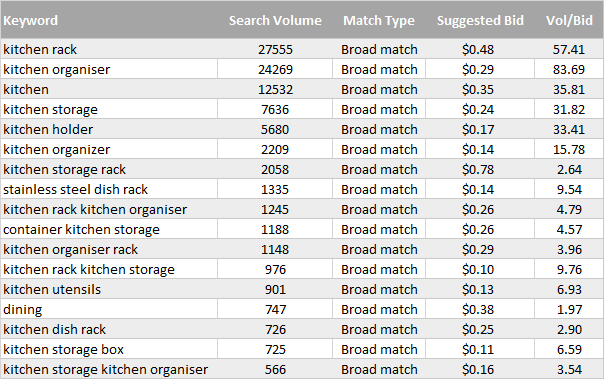
Sample of the output is shown above. I usually sort by search volume (highest). I also add in the Search Vol/Num Bids columns which give some indication of the search volume per 0.1cents of bids.

Selenium can be used to automated the saving of html file.

The “Quality Score” is not able to parse using the read_html method given it is a generated image file. However, for those who are really keen, the quality score is reflected in the image tag attribute [style=”width: x%]. Parsing this will give the the estimated quality score.

Simple way to export Shopee Ads keyword bids data to Excel using python pandas. https://simply-python.com/2021/04/19/export-shopeeads-keyword-bids/

Adding PostgreSQL to Django

Requirements

  1. VirtualEnv
  2. Django
  3. PostgreSQL

Add on to post from Painless PostgreSQL + Django

The recommendation is to follow the steps from the original well-written post and refers to the following to fill in some of the possible gaps .

  1. Activate a virtualenv
  2. Git clone the project (in the post) to local directory
  3. Run pip install -r requirements.txt
  4. Upgrade Django version (will encounter error if this step is not performed). pip install django==1.11.17.  This only applies if you following the post and cloning the project used in the post.
  5. Create new user in Postgres, create new database & grant assess (Step 1 & 2 of post)
  6. Update settings.py on the database portion.
  7. Create environment variables in the virtualenv.  See link for more information.
    1. Note: Secret Key needs to be included as one of the environment variable.
    2. Update the postactivate file of the virtualenv so the environment variables are present when virtualenv is activated.
    3. To get path of the virtualenv: echo $VIRTUAL_ENV

Create new user in Postgres

# Psql codes for Step 1 and 2 of original post.
# ensure Postgres server is running
psql
# create user with password
CREATE USER sample_user WITH PASSWORD 'sample_password';
# create database
CREATE DATABASE sample_database WITH OWNER sample_user;

Update database information in Setting.py

# Changes in the settings.py

DATABASES = {
    'default': {
        'ENGINE': 'django.db.backends.postgresql_psycopg2',
        'NAME': os.environ.get('DB_NAME', ''),
        'USER': os.environ.get('DB_USER', ''),
        'PASSWORD': os.environ.get('DB_PASS', ''),
        'HOST': 'localhost',
        'PORT': '5432',
    }
# SECURITY WARNING: keep the secret key used in production secret!
SECRET_KEY = os.environ.get('DJANGO_SECRET_KEY', '')

Update environment variables in VirtualEnv

# postactivate script in the project virtual env bin path.
# E.g. ~/.virtualenv/[projectname]/bin/postactivate

#!/bin/bash
# This hook is sourced after this virtualenv is activated.
export DB_NAME='sample_database'
export DB_USER='sample_user'
export DB_PASS='sample_password'
export DJANGO_SECRET_KEY='thisissecretkey'

Running migrations (Ensure PostgreSQL server is running)

python manage.py makemigrations
python manage.py migrate
python manage.py createsuperuser
python manage.py runserver

Additional notes:

  1. When running python manage.py runserver on local host and error occurs, check domain is included in the ALLOWED_HOSTS of setting.py. Alternatively, you can use below:
    • ALLOWED_HOSTS = [‘*’] # for local host only
  2. No database created when running psql command: CREATE DATABASE …, check if  semi-colon add to end of the statement. In the event, the ‘;’ is missing, type ‘;’ and try inputting the commands again. See link for more details.

Useful Seaborn plots for data exploration

Types of plots:

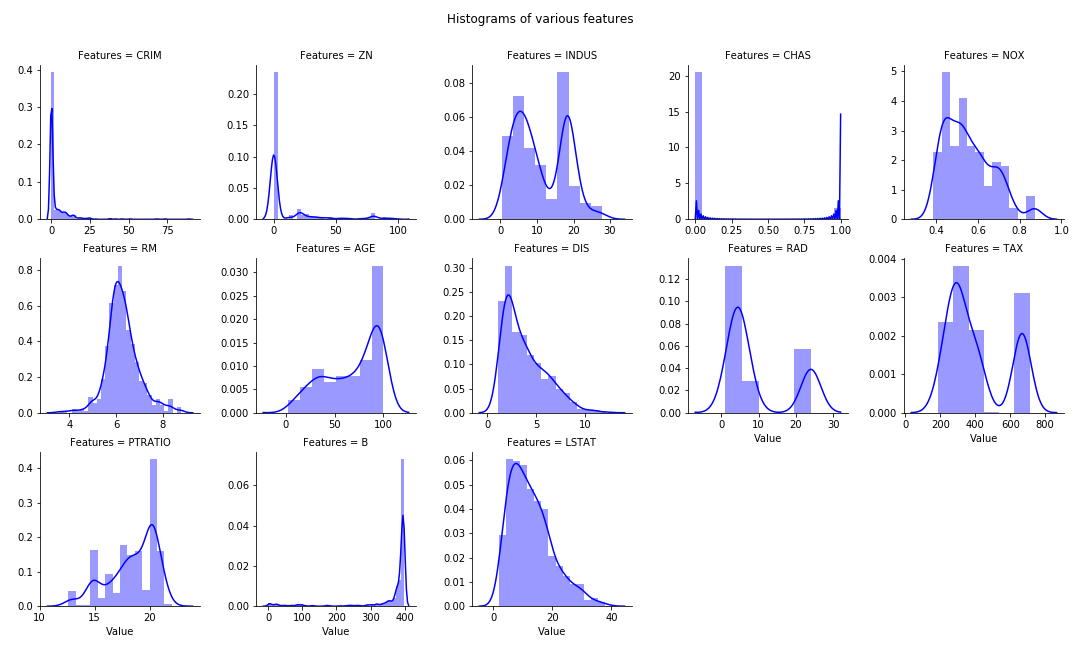
  1. Multiple features histogram in single chart
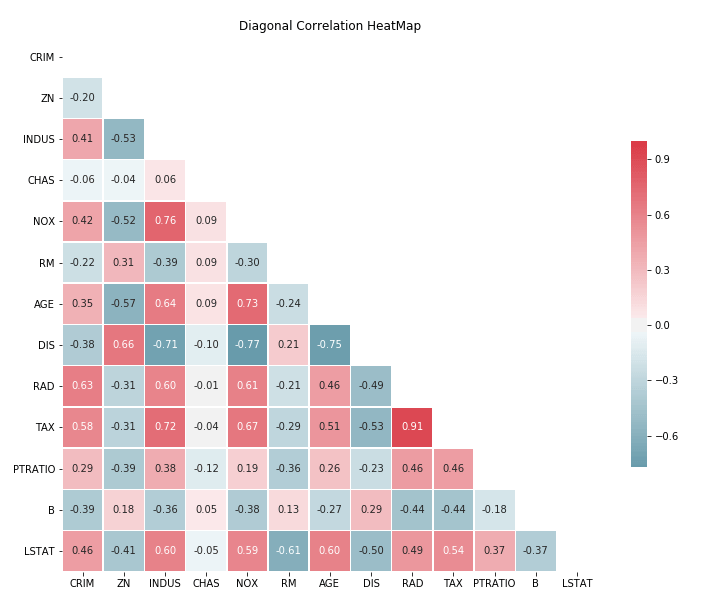
  2. Diagonal Correlation Matrix
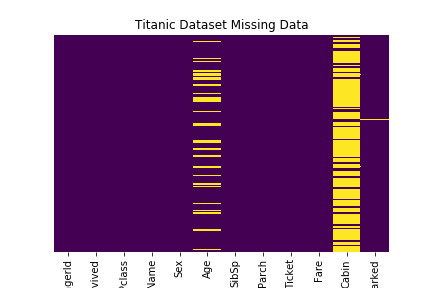
  3. Missing values Heat Map

Boston Housing prices dataset is used for 1, 2. Titanic Dataset for item 3.

Basic Python module import

import pandas as pd
import numpy as np
import seaborn as sns
import matplotlib.pyplot as plt
% matplotlib inline

from sklearn.datasets import load_boston
boston = load_boston()
X = boston.data
y = boston.target
df = pd.DataFrame(X, columns= boston.feature_names)

Multiple Histogram plots of numeric features

  • Stack the dataframe with all the features together. May consume significant memory if dataset have large number of features and observations.
  • If need to separate by group (hue in FacetGrid), can modify the numeric_features:
  • numeric_features= df.set_index(‘Group’).select_dtypes(exclude=[“object”,”bool”])
numeric_features= df.select_dtypes(exclude=["object","bool"])
numeric_features = numeric_features.stack().reset_index().rename(columns = {"level_1":"Features",0:"Value"})
g = sns.FacetGrid(data =numeric_features, col="Features",  col_wrap=5, sharex=False, sharey=False)
g = g.map(sns.distplot, "Value", color ='blue')
plt.subplots_adjust(top=0.9)
plt.suptitle("Histograms of various features")

multiplehist

Diagonal Heat Map of Correlation Matrix

Reference: seaborn.pydata.org. Utilize the Seaborn heat map with masking of the upper diagonal.

f, ax = plt.subplots(figsize=(12, 12))
corr = df.select_dtypes(exclude=["object","bool"]).corr()

# TO display diagonal matrix instead of full matrix.
mask = np.zeros_like(corr, dtype=np.bool)
mask[np.triu_indices_from(mask)] = True

# Generate a custom diverging colormap.
cmap = sns.diverging_palette(220, 10, as_cmap=True)

# Draw the heatmap with the mask and correct aspect ratio.
g = sns.heatmap(corr, mask=mask, cmap=cmap, vmax=1, center=0, annot=True, fmt='.2f',\
square=True, linewidths=.5, cbar_kws={"shrink": .5})

# plt.subplots_adjust(top=0.99)
plt.title("Diagonal Correlation HeatMap")

heatmap

Missing values Heat Map

Reference: Robin Kiplang’at github

dataset ='https://gist.githubusercontent.com/michhar/2dfd2de0d4f8727f873422c5d959fff5/raw/ff414a1bcfcba32481e4d4e8db578e55872a2ca1/titanic.csv'

titanic_df = pd.read_csv(dataset, sep='\t')
sns.heatmap(titanic_df.isnull(), yticklabels=False, cbar = False, cmap = 'viridis')

plt.title("Titanic Dataset Missing Data")

missingdata


Easy Web Scraping with Google Sheets

Google sheets simplify the process of web scraping especially for table and list elements. For below project, the purpose is to obtain common/essential words and their corresponding definitions for GMAT/GRE preparations.

Below are examples of each.

Table type extraction (source)

In one of the cells, type in =IMPORTHTML(url-site,“table”,<table_id>) where <table_id> is the table position in the url (either guess or iterate from 1 to XXX etc or use chrome developer tools to count the table num)  

tabletypeexample

tabletypeexamplegooglesheet


List Type Extraction (source)

In one of the cells, type in =IMPORTHTML(url-site,“list”,<list_id>) where <list_id> is the list order in the url (either guess or iterate from 1 to XXX etc or use chrome developer tools to count the list num)  

listtypeexamplegooglesheet

listtypeexamplegooglesheet1

The above techniques can also apply to other websites that have list or table elements. For this project, one of the next step is to create flash cards video to help in the learning. With the table format in google sheets, it is easy to download the whole list or table as .CSV file and create in the form of flash cards. Check the link for the quick project.


Create own flash cards video using Python

Build your own study flash cards video (+ background music) using Python easily.

Required Modules

  1. moviepy
  2. ImageMagick — for creating text clip
  3. pandas — optional for managing CSV file

Basic steps

  1. Read in the text information. Pandas can be used to read in a .csv file for table manipulation.
  2. create a Textclip object for each text and append all Textclips together
  3. Add in an audio if desired.  Allow the audio to loop through duration of the clip
  4. Save the file as mp4.

Sample Python Project — Vocabulary flash cards

Below is a simple project to create a vocabulary list of common words use in GMAT etc. For each word and meaning pair, it will flash the word followed by its meaning . There is slight pause in the timing to allow some time for the user to recall on the meaning for the particular words

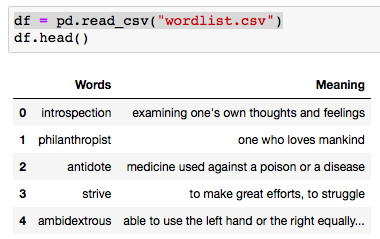
Sample table for wordlist.csv (which essentially is a table of words and their respective meanings) * random sample (subset) obtained from web

Screen Shot 2019-07-23 at 11.32.42 PM


def create_txtclip(tgt_txt, duration = 2, fontsize = 18):
    try:
        txt_clip = TextClip(tgt_txt, fontsize = fontsize, color = 'black',bg_color='white', size=(426,240)).set_duration(duration)
        clip_list.append(txt_clip)
    except UnicodeEncodeError:
        txt_clip = TextClip("Issue with text", fontsize = fontsize, color = 'white').set_duration(2)
        clip_list.append(txt_clip)

from moviepy.editor import *

df = pd.read_csv("wordlist.csv")
for word, meaning in zip(df.iloc[:,0], df.iloc[:,1]):
    create_txtclip(word,1, 70)
    create_txtclip(meaning,3)

final_clip = concatenate(clip_list, method = "compose")

# optional music background with loop
music = AudioFileClip("your_audiofile.mp3")
audio = afx.audio_loop( music, duration=final_clip.duration)

final_clip = final_clip.set_audio(audio)

final_clip.write_videofile("flash_cards.mp4", fps = 24, codec = 'mpeg4')<span id="mce_SELREST_start" style="overflow:hidden;line-height:0;"></span>

In some cases, the audio for the flash cards does not work when play with Quicktime, will work on VLC

Sample video (converted to gif)

ezgif.com-video-to-gif